




You're standing in the shower, looking up at a head that sprays sideways, drips after shut-off, and has collected enough scale to look permanently tired. The job appears simple, but a rushed shower head replacement can damage the wall arm, split a fitting, or leave a slow leak hidden behind a neat chrome finish.
A straightforward like-for-like swap is usually a short DIY task when the arm and thread are sound. The more important decision is choosing a head that suits the property. In Australia, the WELS star rating and flow rate affect water use, rental compliance, spray comfort, and the way an older plumbing system feels at the outlet.
Table of Contents
- Why Replace Your Shower Head and What Success Looks Like
- Tools, Parts and Compatibility Checks Before You Start
- Removing the Old Shower Head and Fitting the New One
- Choosing a WELS-Rated Showerhead That Actually Performs
- Common Problems, Troubleshooting and When to Call a Plumber
- Quick Checklist and Getting Help from Total Plumbing
Why Replace Your Shower Head and What Success Looks Like
A replacement makes sense when the existing head has blocked nozzles, a damaged swivel, inconsistent spray, or a drip that continues after the tap is closed. Cleaning can help with surface scale, but it won't repair a cracked body, worn seal, or corroded connection. A new head also gives you a chance to match the fixture to your household's actual needs instead of accepting the flow rate chosen years ago.
In Australia, shower heads have been covered by mandatory WELS water-efficiency labelling since 1 July 2006. The scheme rates products from 0 to 6 stars and requires the label to show both the star rating and flow rate, so you can compare products before buying. The Victorian shower-head discount and efficiency guidance also explains why the rating matters beyond marketing. A compliant modern installation is generally benchmarked around the Plumbing Code of Australia's maximum 9 litres per minute, which corresponds to a 3-star WELS rating.
What a good replacement achieves
On site, I'd call the job successful when the spray lands where it should, the swivel stays in position, the head shuts off without a persistent drip, and the joint remains dry after testing. The box should show a valid WELS label with the product's star rating and litres-per-minute figure.
The water-saving result matters too. Government guidance says replacing a 15 L/min shower head with a 3-star 9 L/min model can save a family of four about 70 kL of water and $210 per year, while a 5-star 6 L/min model can save about 105 kL and $315 per year. Those figures come from the Australian Government's household water-efficiency guidance. The catch is that lower flow only works if the spray still feels usable for the people using it.
Practical rule: A shower head that saves water but gets removed from service because everyone dislikes the spray hasn't solved the household's problem.
Older Melbourne homes can have ageing galvanised pipework, restricted feeds, or accumulated internal scale. In those properties, a very low-flow head may expose an existing supply limitation. Choose the rating with both the water bill and the shower experience in mind.
Tools, Parts and Compatibility Checks Before You Start
Gather everything before removing the old fitting. The basic job needs an adjustable shifter or a correctly sized wrench, a microfibre cloth, an old toothbrush, PTFE thread tape, a small bucket, and a Phillips screwdriver if the replacement includes a bracket or accessory. A cloth between the wrench and chrome protects the finish and gives you a better grip without resorting to excessive force.
The parts that matter
Buy a replacement shower head with a matching 1/2-inch BSP connection, which is the thread standard you'll normally expect on an Australian shower arm. Keep a new rubber inlet washer available, even if one is supplied with the head. Some fittings seal at the washer rather than at the thread, and omitting it can create a leak from the first test.
An optional replacement arm is sensible when the existing arm is pitted, visibly corroded, bent, or weakened around the male thread. If the property has an older galvanised arm, inspect the exposed section carefully before putting a wrench on it. Surface corrosion is one thing. Wall thinning or a badly damaged thread is a reason to stop, isolate the water, and arrange proper plumbing work.
For related hot-water work, keep the hot water systems service information separate from this fitting decision. A shower head swap won't correct a failing tempering valve, unstable hot water supply, or a hot-water system fault.
Check the new product before buying
Read the WELS label rather than relying on packaging phrases such as “water saving” or “high pressure”. Confirm the star rating, stated flow rate in litres per minute, and registration details. If you're changing to a rainfall head, compare its reach and face size with the existing shower space. A larger head can alter the spray position and may feel less forceful when the same water volume is spread across a wider area.
Don't assume every threaded fitting will interchange. BSP and NPT threads aren't the same standard, and forcing a mismatched connection can cross-thread the arm or head. If the thread doesn't start smoothly by hand, stop. A wrench shouldn't be used to persuade an incompatible fitting into place.
Removing the Old Shower Head and Fitting the New One
Start by placing a rag over the bath or shower tray. It protects the surface if a fitting drops and gives small washers somewhere obvious to land. Turn the shower tap off fully, then look at the connection between the head and the arm before touching it. You want to know whether you're loosening only the head or whether the arm is beginning to move in the wall.
Wrap a cloth around the shower arm close to the wall and hold it with the shifter. This is a stabilising grip, not an invitation to lean your body weight on the fitting. Try turning the old head counter-clockwise by hand first. If the seal isn't seized, it may unthread without tools, which is the safest outcome.
Break the seal without breaking the arm
If the head is stuck, controlled warmth from a hair dryer can help loosen old thread sealant and mineral deposits. Don't use a torch near tiles, waterproofing, seals, or other bathroom materials. Warm the fitting gradually, protect the finish with the cloth, and apply steady force to the head while keeping the arm supported.
If the arm starts turning in the wall, stop immediately. The concealed connection may be moving behind the wall lining, and continued force can crack the fitting or create a leak that won't be visible until the wall cavity has taken water. A shower arm that won't release without force is a plumbing repair, not a test of strength.
Once the old head is off, scrub the exposed male threads with an old toothbrush. Remove old PTFE tape, scale, dirt, and fragments of a fibre washer. The new seal can't sit correctly over a damaged lump of old material, and debris can stop the replacement head from seating squarely.
Make the new connection
Wrap PTFE tape clockwise around the male arm thread, following the direction the new head will turn. Use two to three wraps only. Excess tape creates a bulge that can prevent the female thread from engaging properly, and it can encourage over-tightening when the fitting feels hard to seat.
Check that the rubber inlet washer is inside the new head before starting it. Hand-thread the head clockwise until the washer meets its seat and the fitting is aligned. Then use the wrench over a cloth for approximately a quarter turn. The aim is a firm seal, not maximum torque.
The arm is the part you protect. Hold it steady, keep the wrench close to the joint, and never use the wall as leverage.
Turn the shower on and let it run for 30 seconds, then dry the joint completely. Watch the connection for 60 seconds. A dry paper towel around the nut is useful because it shows a fine seepage that can be missed on shiny chrome. Over-tightening can crack the new head, under-tightening can leave a constant drip, and forgetting the rubber washer can produce a leak immediately.
Choosing a WELS-Rated Showerhead That Actually Performs
The highest star rating isn't automatically the best choice for every Australian home. A 3-star head has the stronger flow benchmark, while 4-star and 5-star products reduce water delivery further. The Australian Government notes that 4- and 5-star showerheads must pass extra tests for spray force and coverage, so WELS efficiency isn't intended to be judged only by the litres-per-minute figure. The Victorian WELS shower-head information is useful when checking how efficiency and performance are treated together.
For a family of four replacing an older 15 L/min head, the verified comparison is clear:
| WELS Rating | Flow (L/min) | Annual Water (kL) | Annual Cost (AUD) | Pressure Notes |
|---|---|---|---|---|
| 3-star | 9 | Saves about 70 | Saves about $210 | Fuller flow and generally the safer comfort choice for restricted systems |
| 5-star | 6 | Saves about 105 | Saves about $315 | Greater saving, but may feel weaker where pipework or supply is limited |
The savings figures in the table come from Australian Government water-efficiency guidance. A 4-star product should be assessed from its own WELS label rather than guessed from the star count alone. Read the stated flow rate, then compare its spray pattern and performance claims with the bathroom's supply conditions.
Pressure is more than a marketing label
A shower head doesn't create additional water pressure in the pipework. It changes how the available water is distributed through the nozzles. A compact head with a focused pattern can feel stronger than a broad rainfall head using the same supply, while a wide face can spread the flow and feel softer.
Older homes deserve particular care. Galvanised pipework may have internal restriction from age and corrosion, and a lower-flow head can make that limitation more noticeable. If the existing head already delivers a poor spray after cleaning, replacing it with the lowest-flow option may disappoint. A moderate WELS choice with an effective spray pattern can produce a better balance between savings and comfort.
Read the label and inspect the design
Look for the WELS star rating, litres-per-minute figure, and product registration information. Then check the physical details that affect daily use:
- Spray pattern: A focused or adjustable spray can suit restricted supply better than a very broad rainfall pattern.
- Swivel clearance: Confirm the ball joint can move without contacting the wall, flange, or tile.
- Thread connection: Verify the replacement uses the required 1/2-inch BSP connection.
- Nozzle access: Easy-clean silicone nozzles are more practical where scale builds quickly.
- Supplier status: Buy a properly WELS-labelled product through an Australian supplier when compliance, documentation, or a future rental inspection matters.
For Victorian rentals, this decision has a deadline. The Victorian rental efficiency standards require replacement shower heads supplied by a rental provider to meet at least 3-star efficiency, and the requirement is scheduled to tighten to 4-star WELS for new rental agreements or month-to-month conversions from 1 March 2027.
Common Problems, Troubleshooting and When to Call a Plumber
A shower head replacement is often DIY-friendly, but the phrase “just screw it on” hides the risk. The visible head is only the end of a threaded arm connected inside the wall. If that concealed connection moves, cracks, or separates, more force won't fix the problem.
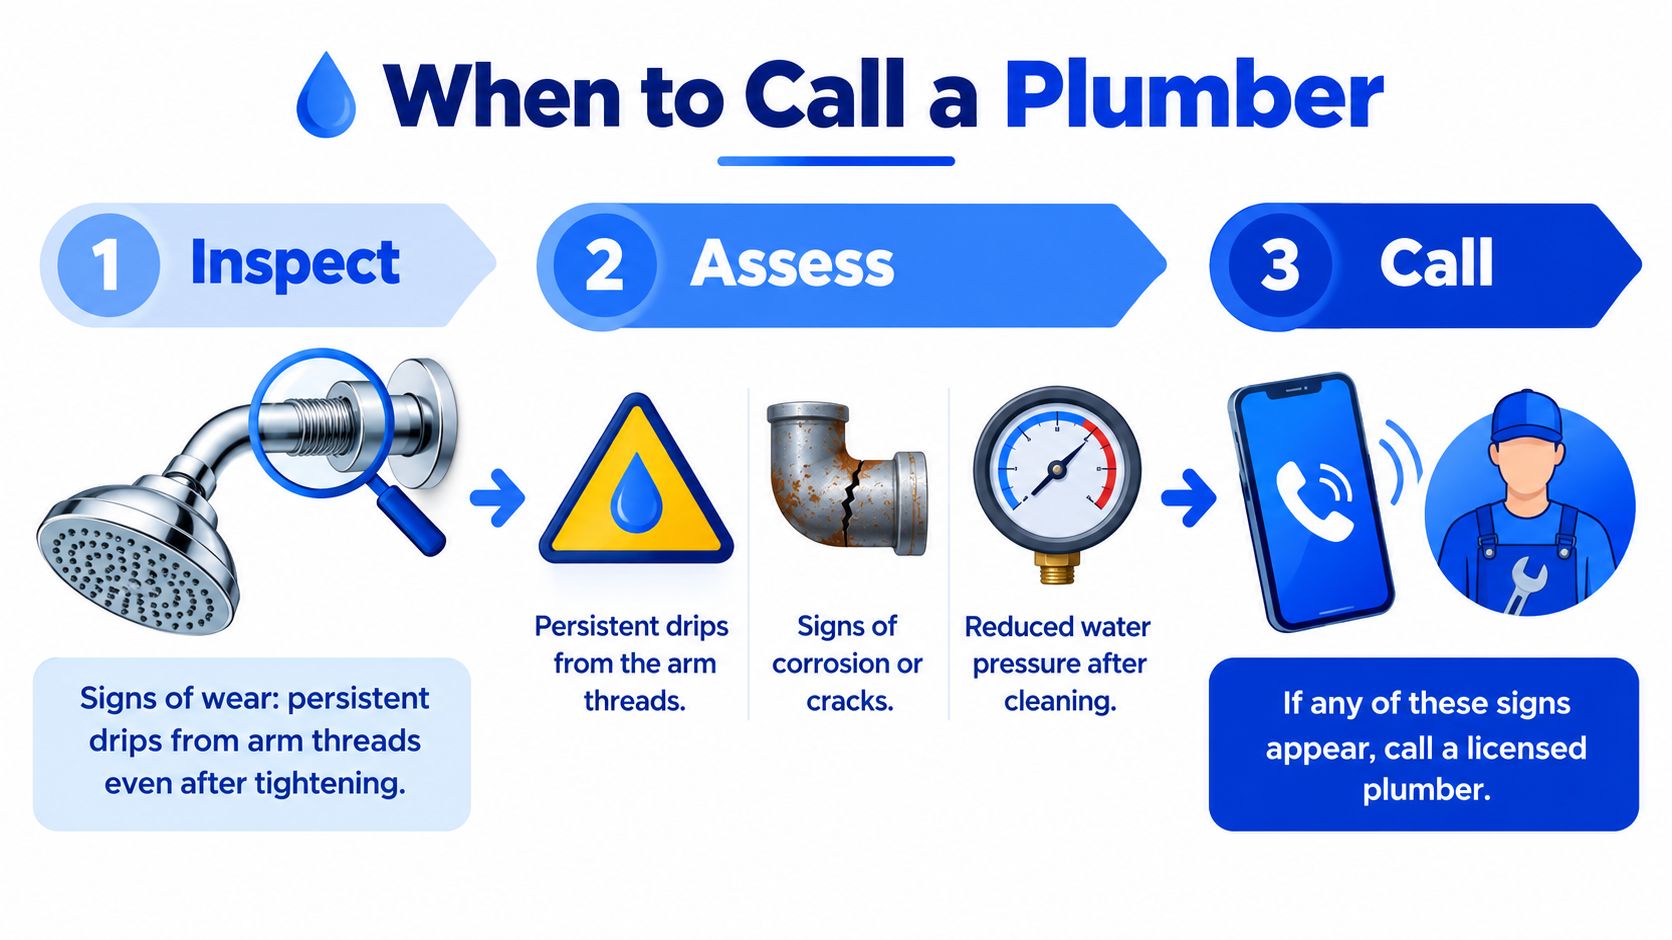
Call a licensed plumber when the arm turns at the wall, the exposed thread is badly corroded, the joint continues leaking after the washer and tape have been checked, or the replacement requires a new arm, altered pipework, tile drilling, or work on a tempering or thermostatic mixing valve. In Victoria, work beyond a simple like-for-like head change can require licensed plumbing involvement. Rental providers should also plan around the 4-star WELS requirement scheduled from 1 March 2027 for the specified new agreements and conversions, rather than fitting a product that will soon fall short.
Use the symptom to find the fault
Leak at the nut: Remove the head, confirm the rubber washer is present and correctly seated, clean the threads, and reassemble with limited tape. If water still appears from the arm thread, suspect a damaged arm or wall connection rather than adding more tape.
Weak flow: Clean the inlet screen and spray nozzles first. If the supply remains poor, the issue may be restricted pipework, a supply limitation, or a valve fault. A replacement head can't repair low incoming pressure.
Uneven spray: Mineral deposits commonly block individual nozzles. Clean the head according to the manufacturer's instructions. If the spray remains distorted, the faceplate or internal flow path may be damaged.
Temperature swing: A shower head won't correct a temperature-control problem. Fluctuation can point to a tempering valve, mixer, hot-water supply, or simultaneous demand issue, so stop treating the head as the cause and arrange an assessment.
Don't mask a supply fault with a fitting. A head that appears to improve flow can hide the condition of the arm, valve, or pipework.
For help with a concealed or continuing leak, use the water-leak repair service rather than repeatedly tightening the fitting. The priority is to protect the wall connection and identify where the water is escaping.
A visual walkthrough can help you recognise the basic sequence before starting. Watch the installation video below, then stop and inspect your own arm condition before copying the fitting technique.
Quick Checklist and Getting Help from Total Plumbing
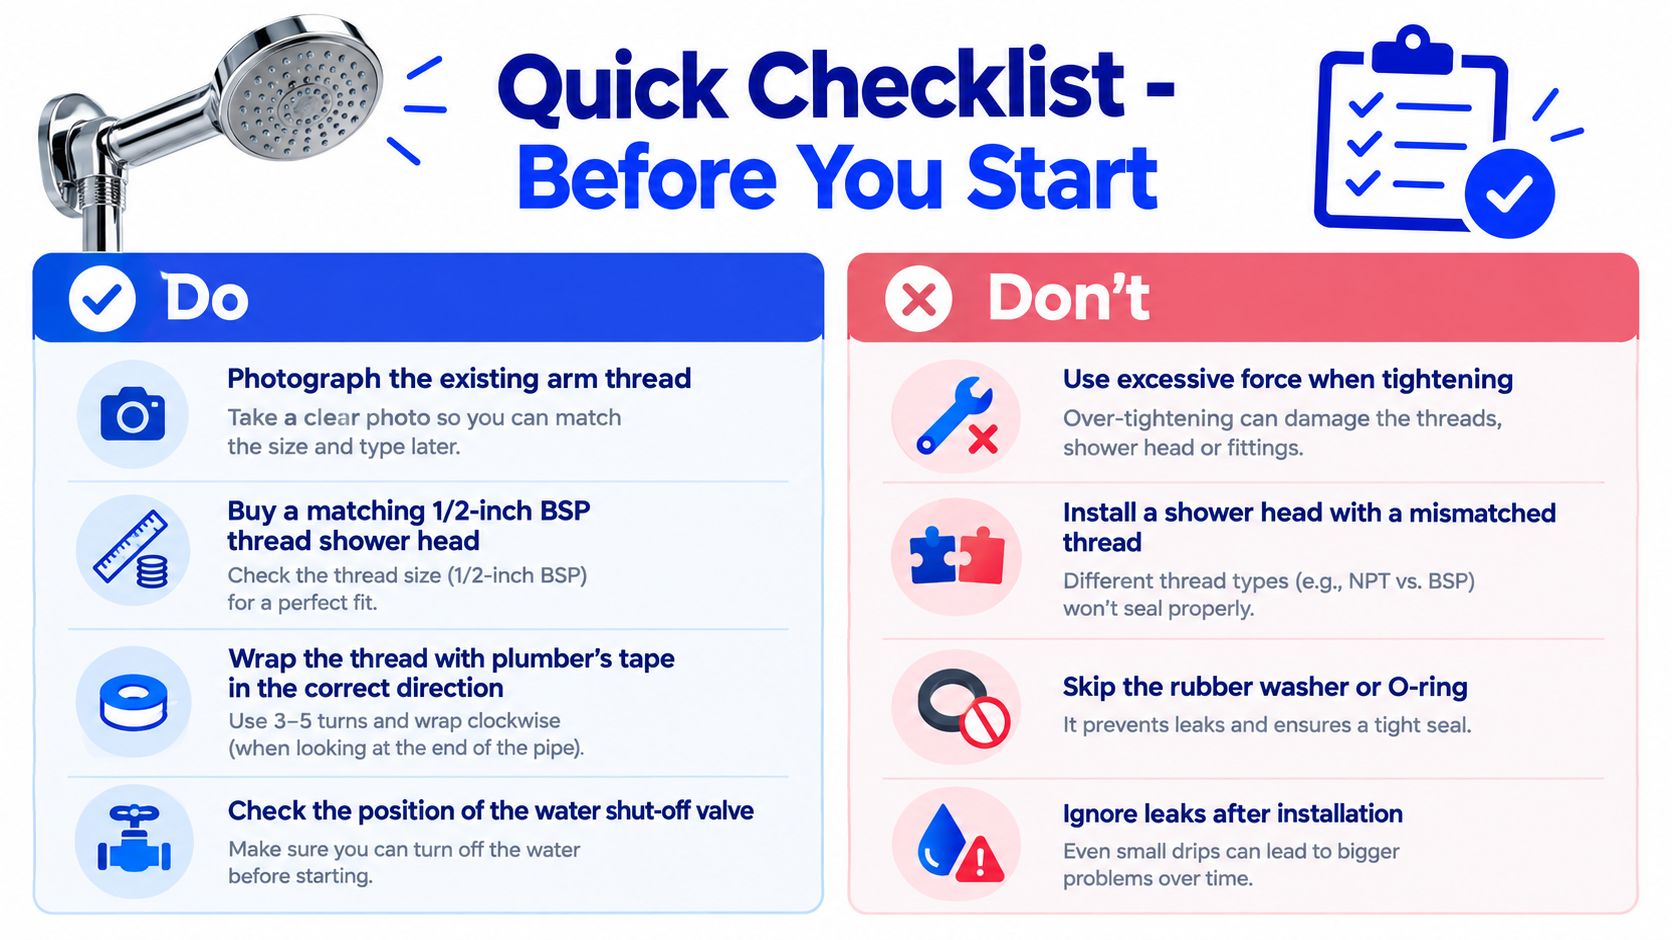
Before you leave the hardware shop, take a photo of the existing shower arm and thread. Buy a replacement with a matching 1/2-inch BSP thread, a WELS label, and a flow rate that suits the household rather than choosing only by appearance. Keep the old head if you're renting, because returning the original fixture can help avoid an argument about the property's condition at the end of the tenancy.
The short version
- Photograph first: Record the arm, flange, thread, and existing head position.
- Check the label: Confirm WELS rating and litres per minute before paying.
- Use the washer: Fit the rubber inlet washer supplied with the new head.
- Tape correctly: Wrap PTFE tape clockwise on the male thread only, not on the swivel ball joint.
- Tighten gently: Hand-tighten, then add a small quarter turn through a cloth.
- Test properly: Run the shower, dry the joint, and check again for seepage.
- Avoid force: Don't force a seized head or twist the arm inside the wall.
- Plan isolation: If changing the arm, locate the water isolation point before starting.
- Protect the tiles: Don't drill or alter the wall without checking for concealed pipework.
- Act on leaks: A drip that remains after correct assembly needs investigation, not more force.
If the job involves a sound existing arm and a compatible head, a careful homeowner can often complete it neatly. For western-Melbourne homes and rentals, contact Total Plumbing & Hot Water Systems when the arm is corroded, the leak is concealed, the supply is weak, or the work goes beyond a like-for-like replacement. The company handles licensed plumbing and water-leak work, provides fixed-price quotes, and works across areas including Caroline Springs, Taylors Hill, and Melbourne's western suburbs.
Total Plumbing & Hot Water Systems can inspect the arm, replace a failed shower fitting, trace leaks, and help landlords select a WELS-compliant option before the Victorian rental rules scheduled for March 2027. For practical advice and a quote for your shower head replacement, visit Total Plumbing & Hot Water Systems.